Door Installation
Door Installation Overview
Replacing an exterior front door can add much value, and curb appeal to your home, and without spending a lot of money. Give us a call or email us to find out more, or to schedule an estimate.
Door Choices
The choices these days are endless and over the past few years the features that are available are also fantastic. Here are a few choices a homeowner may choose from.
Blinds inside the glass that can go up and down and also tilt, wood grain on the inside and custom paint on the outside, wide variety of stained or etched glass, weather stripping and threshold are part of the jamb, brick mold on the outside can be a plastic resin that will not rot, fiberglass or steel doors are available. There are even custom colored hinges! The prices are consumer friendly. These are just a few options that are available.
Handymen Typically Follow these Steps to Replace or Install a Door
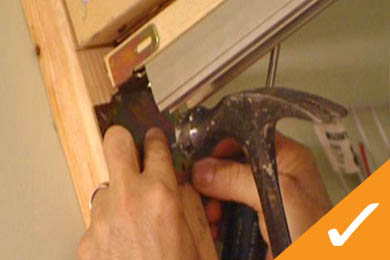
Take a razor blade knife and cut the paint next to the casing on the inside of the door and carefully remove the casing and save to reinstall later. Remove the door from the hinges by pulling the hinge pins and then take a sawzall and cut horizontally through both sides of the jamb but NOT cutting the 2×4 stud. Remove and make sure the 2×4’s are clean of debris and no drywall is hanging over if so cut it off flush. Take all the shipping material off the new door including a big black corkscrew in the lockset hole and disregard. Carefully insert the new door from the outside in, into the opening evenly spacing both sides by shimming at the hinge points and likewise on the lockset side. Then remove the screw in the hinges closest to the weatherstripping and replacing it with a 3” gold screw and screw through the shims into the 2×4’s. Do this on all 3 hinges and on the lockset side also making sure the margin around the inside of the door is the same, approximately 3/16”. Foam the entire gap between the door and the 2×4 with DAP Window and Door Foam. Nail the outside brick mold with finish nails and putty using DAP white ALEX caulk. Caulk exterior line between brickmold and siding/brick. Caulk bottom of threshold with a thick bead also. Install deadbolt and lockset.
Re-install casing on inside using a finish nailer and pin gun. Apply a small bead of caulk next to casing on inside to stop any cold air from leaking in. Install a piece of stained wood on the inside threshold of door on the floor as a transition strip. Done Right Works handyman services provides personal labor estimates. These guidelines are helpful hints for installation and are not exact instructions. Done Right Works is not responsible for self-installed doors or adjustments that may need to be made.
Award Winning Handyman Services


2026 © DoneRightWorks, LLC. All rights reserved. | Sitemap